
Customizing VisiData - Colors
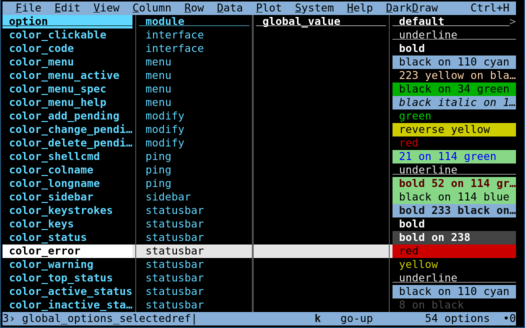
Color Options
Interface elements and colors can be set on the command-line before a session, or in .visidatarc to take effect for every session, or within VisiData on the Options Sheet (Shift+O). Color options in particular start with color_:
vd --color-selected-row="magenta"or in .visidatarc:
options.color_selected_row = "magenta"On the Options Sheet, if you edit a color (or any display element), you will see the changes immediately, both in the options value (which is itself colorized) and also in the interface. Shift+U to undo if you don't like it.
Color Specification
Colors in the terminal have 3 components: foreground, background, and attributes. In most modern terminals, each of the foreground and background colors can be one of 256 colors in a standard palette.
Several attributes are also available: bold, italic, reverse, and underline. (There are other attributes like dim and blink, but they are not widely supported).
In VisiData, colors are specified with a simple language:
<attribute> <fg-color> on <bg-color>where <attribute> is a plain text name as above, and each <color> is a number from 0-255, or a basic color name from the original 8-color palette: black red green yellow blue magenta cyan white. Multiple attributes may be specified.
Most terminals support 256 colors, but because some do not, it's possible to specify a fallback color, which is a second color that's used in case the first color isn't available. For instance, 215 yellow means to use the color 215 (kind of orange-brown), but if it's not available, use yellow instead.
Multiple colors may be applied to a single interface element with different precedence, for instance with colorizers. The color used will be the highest precedence background and the highest precedence foreground, which may come from separate color strings. All attributes will be applied regardless of precedence--there is no way to specify a negative attribute or "no" attributes.
Any of the color components may be omitted, letting that component be given by a lower-precedence colorizer instead, ultimately falling back to color_default (white on black in the default theme). Many color strings only specify a single attribute.
The ordering above--attributes first, then foreground, and finally background--is suggested and preferred. Attributes may be specified anywhere in the color string; this does not change their effect (e.g. bold applies to the font rendered, not to the foreground or background color, even if bold text makes the foreground color seem brighter). The reverse attribute flips the foreground and background color. Multiple reverse attributes do not undo each other.
256 Terminal Colors and the Colors Sheet
To see all the available colors and what they look like in your specific terminal, run the open-colors command. (This command is not bound to any keystroke, so must be executed by its longname; press Space, then type open-colors, then press Enter.)
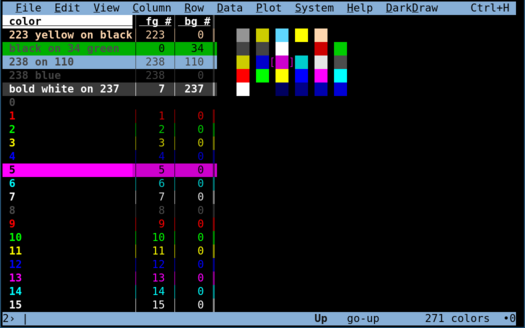
The first several rows on this sheet are the existing color strings that are currently in use. After these are the numeric colors; note that colors 0-7 correspond to the named colors above, with 0 being black and 7 being standard white. Colors 8-15 are unnamed brighter versions of these colors: 8 is gray ("bright black") and 15 is bright white.
Colors 16-231 form a regular color cube with a wide variety of gradations covering the color space. Colors 232-255 are gradients of white, with 232 being the darkest possible gray (almost indistinguishable from the black of 0 and 16), and 255 being almost the brightest white (though 15 is brighter).
Changing Display Attributes within a string
In many interface elements, it's possible to change the display attributes inline, within a single string. For example, the menu bar has a message displayed in the upper right (which by default shows "Ctrl+H for help menu"), and is configurable with options.disp_menu_fmt. The base menu color is configurable with options.color_menu, which is also applied to this menubar message. However, this can be changed by specifying a new color within the string itself, using syntax like [:red]:
options.disp_menu_fmt = "[:red on black]{vd.motd}"A color option name can also be used instead of a real color; for example, to use the color_error color, use [:error]:
options.disp_menu_fmt = "[:error]{vd.motd}"Attribute changes can happen multiple times in a single string. Use [/] to clear the last inline color change, and [:] to clear all inline attributes:
options.disp_menu_fmt = "[:underline]Note:[/] [:error]{vd.motd}"What follows the / is not checked, so these are all valid:
[:underline]underlined text[/underline]
[:underline]also underlined[/]
[:underline]underline ends at end of string
onclick
In addition to changing the display attributes, an onclick attribute can be given with this inline syntax, which specifies either a VisiData command to run, or a url to open (in $BROWSER), when the interface element is clicked:
options.disp_menu_fmt = "[:onclick https://jsvine.github.io/intro-to-visidata/]Click here to go to the tutorial[/]"Or if you want a custom VisiData toolbar some of your favorite actions:
vd --disp_menu_fmt="[:onclick freq-col] freq out [/] | [:onclick quit-sheet] back [/]"Elements with onclick are displayed with color_clickable, which is by default underline, which is commonly understood as a clickable affordance.
Setting the Theme
A set of configured display elements and attributes may be packaged into a theme, which can be set as an option before VisiData starts (on the CLI or in .visidatarc), and can be changed with the theme-input command (in the menu under View > Set theme).
By default VisiData uses a dark-mode color scheme and some suggestive Unicode characters. A few non-default themes are also packaged with VisiData:
light: light-mode color schemeascii8: ascii characters and basic 8-colors onlyasciimono: ascii characters and default colors only
To use VisiData on a classic DEC VT102 terminal:
vd --theme=asciimono[I would love to know of anyone using VisiData in such a lo-fi situation!]
Adding a new theme
To add another theme, add it to the vd.themes dictionary in .visidatarc. If more than one person uses it, submit a PR to include it in the visidata/themes directory.
vd.themes['awesome'] = dict(
    color_default      = 'black on white',  # the default fg and bg colors
    color_key_col      = '20 blue',   # color of key columns
    color_edit_cell    = '234 black',     # cell color to use when editing cell
    # ... etc
)
Colorizers
TableSheet sheets (which is any sheet with a row/column grid, i.e. most sheets) have colorizers, functions that can provide display attributes on individual rows, columns, or cells.
See docs/api/interface for how to use colorizers.
Conditional Formatting
For ad-hoc conditional formatting from inside a session, three commands attach a colorizer to the current sheet that paints cells, rows, or columns wherever a Python expression is truthy:
color-cell-- color individual cells (a CellColorizer)color-row-- color whole rows (a RowColorizer)color-col-- color whole columns (a ColumnColorizer)
Each command pops up a two-field form prompting for an expr: (the Python expression) and a color:. The color: field is pre-filled with the first color from red green yellow cyan magenta blue (and their on <color> background variants) that isn't already in use on this sheet.
The color: field accepts any color string (red, bold green, on red, 215 yellow on 17) or any color_* option name -- with or without the color_ prefix. So error resolves to color_error, current_row to color_current_row, etc., picking up whatever your theme defines for that role.
Like addcol-expr and select-expr, bare column names in the expression resolve to that column's typed value for the current row, so temperature > 100 Just Works on a sheet with a temperature column. In addition, four bindings are always available, each under a short and long name:
s/sheet-- the sheetc/col-- the Column object the colorizer is being asked aboutr/row-- the row objectv/value-- the typed value of the current cell
Examples (assuming a sheet with columns name, score, status):
color-cell  red          value < 0
color-cell  bold green   score >= 90
color-row   on red       status == 'failed'
color-col   underline    c.name.startswith('total_')
Notes
- Row colorizers evaluate per cell, not per row. The colorizer dispatcher walks each cell as it draws and asks every colorizer whether to apply. Inside a
color-rowexpression,vandvaluetherefore refer to the current cell being drawn, not "the row's value" -- so a row-level rule likevalue > 100will only light up cells that match, not entire rows. For real per-row rules, reference the row by bare column name (status == 'failed'). - Empty
color:is meaningful. If you blank out the color field, the colorizer falls back to using whatever the expression itself returned as the color string. That lets an expression compute the color dynamically -- e.g.'red' if value < 0 else 'green' if value > 0 else ''-- though in practice you'll want a literal color most of the time. - Performance. These commands use the existing colorizer infrastructure that already drives selected-row highlighting, key-column coloring, etc. The expression is compiled once at command time and re-evaluated only on cells that get drawn, so the cost is bounded by the visible viewport, not the size of the sheet.
- Type errors are silent. Cells where the expression raises an exception (e.g.
value > 50on a column that has not been typed as a number, sovalueis still a string) are simply not colored. If acolor-cellrule isn't lighting anything up, set the column type first (#for int,%for float) or wrap the comparison (int(value) > 50). Run vd with--debugto see the raised exception in the status log. - No persistence yet. Conditional-format colorizers live on the sheet instance for the session and are lost when the sheet is closed. To re-apply them in a future session, save the commands as a macro or add them to your
.visidatarc.